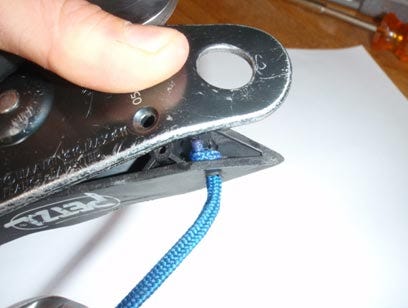
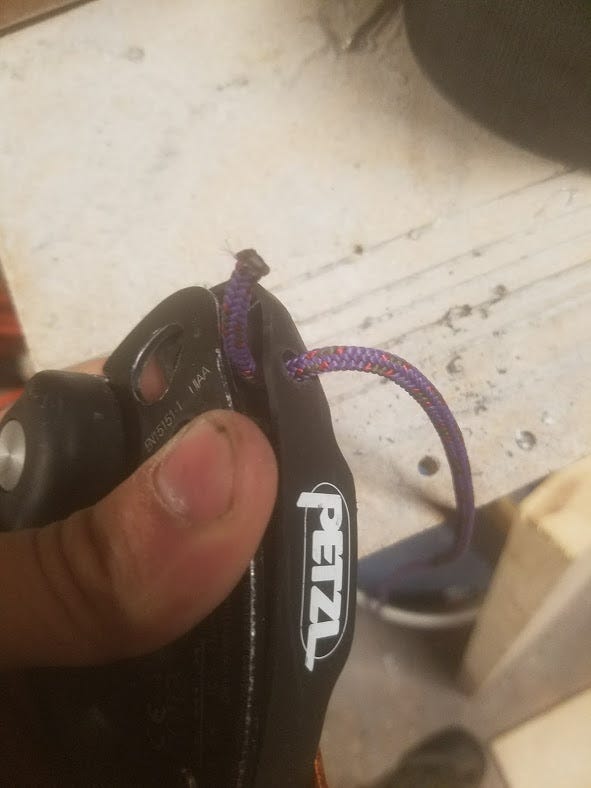
The Grigri Tether - Gear Modification
Add a quick and simple tether to any model of grigri, and never worry about dropping it again
To begin, I think it’s first important to talk about why some people mod their grigri. There’s a ton of climbing gear out there, and you don’t really want to drop any of it, and it’s not the only thing on your harness that’s expensive and heavy.
The simplest answer, for rock climbers (arborists are also fond of this mod) is in top managed sites- any time you’re belaying someone from above. With a plaquette (guide mode) style belay device, attaching and removing the rope is simply a matter of clipping and unclipping a locking carabiner through the keeper wire on the device. For the grigri, you need to completely unclip the device to add and remove a rope.
With multiple partners, attachments and other pieces to work with in the system, things can complicated, and the grigri tether is the only solution to allow comfortable one handed operation in such a situation.
Another reason this is the most common modification seen in modern recreational climbing gear is simply that it doesn’t interfere with anything. While it can feel in-the-way for your climbing partner using it for the first time, the tether is unobtrusive to add security to your gear without fundamentally changing how the device operates. Initially, many get the tether tangled in their belay loop or rope. Avoiding this is simple and it'll be muscle memory before you know it- clip the carabiner into the grigri, then rotate it all the way around, so that the gate opens away from the grigri before clipping it to the anchor or belay loop.
Other popular grigri modifications do change how the device performs, how it interacts with a rope, I am in no way encouraging these modifications be made, and won’t be talking further about them.
Is it safe?
If you modify your climbing gear, in any way, you will die. There are no reports of grigri-tether-attachers surviving more than 100 years past the day they secure their device, and any modifications you make are at your own risk.
In all seriousness, let’s take a look. Petzl, of course, forbids any device modification. Like all manufacturers, they mention in all literature for their hard goods to check for any such modification, and discontinue use if any are present. Petzl, however goes a step beyond where many other manufacturers stop, providing a wealth of best practice diagrams and instructions, technical content for recreational climbing as well as professional rope work.1
There are two documents in particular I’m going to use to suggest this modification is, at the very least, fine. The first2 is the technical notice, it’s the folded paper that comes with your grigri and describes basic parts and functionality. The beginning of this document labels each of the pieces of the grigri, everything from the faceplate down to rivets. It doesn’t mention at all the plastic spacer we’re going to be modifying here, but we can get more confirmation of this. The second3 document is the Inspection Procedure, an explicit checklist of everything you need to verify about each type of grigri to ensure it’s still serviceable. Here, again, we have an exhaustive list, checking for cracks and deformation, even “marks”, “fouling” and “wear” on the each part of the grigri that ostensibly could be an issue, and again, makes no mention our plastic spacer.
Now, to be clear, these documents both mention to ensure there are no modifications made, but, combined with clear instructions on this modification going back over a decade4, these omissions would not exist if issues were arising from such modifications.
Additionally, to perform this modification, we’re going to have to get into our grigri. We’ll do this by way of the very end-consumer friendly Philips head screw, and as far as I can tell, there’s no other reason either you or a theoretical service center would be removing it to get into the device.
Last, before the instructions, I want to remind you that this is a blog on the internet. A new one, at that. Having pictures and instructions alone shouldn’t be your litmus test for what you should do, make sure you understand what and how and why.
Materials
The grigri tether works for all models of grigri, but ever so slightly differently for each, but your materials will be the same. You’ll need something to drill the hole, a carabiner you’re going to be attaching to and some cord. For the original tutorial I made5, I used some thick 4mm cord, made a big hole in my grigri, and attached it to a normal BD Rocklock with a figure eight on a bight.
It turns out, Petzl actually makes a carabiner with hole specifically intended for tethering your gear to (it comes in orange or black screwgate options, plus twistlock and tri-action versions). The Sm’d works great with the grigri6, however the locker your grigri is already hanging from? That’s going to work fine too.
The 1-3mm cord from your local shop is perfect for the mod, get a a foot or so, just in case you mess up the length. If you don’t have a shop nearby, you can grab some 1.3mm dyneema string that’ll serve perfectly here and be handy for other projects as well.
Instructions
Now that you have your
Grigri
Drill with appropriate bit for the diameter cord you’re using
Philips Screwdriver
Locking carabiner
You’re all set!
Start by removing the screw on the left side of the grigri, next to the hole for the carabiner, it’s in basically the same spot on each model of grigri.
Next, PUT THE SCREW SOMEWHERE SAFE.
Now, look inside your grigri to understand the layout of the inside of the plastic spacer, so you can better identify where to drill. DO NOT TRY TO PULL THE PLASTIC SPACER OFF THE DEVICE, instead, with the faceplate open, you’ll be able to see inside.
The location of the hole will differ depending on which type of grigri you’re using, but for each, you’ll want to use the spot closest to the center of the space you’re putting the stopper knot in.
The Grigri 1 has plenty of space inside, but the hole for the screw is reinforced by plastic branching out on either side, so drill a hole such that it doesn’t intersect this support.
The Grigri 2 has much more space, as the hole for the screw is only reinforced up and down. Again, drill a hole in the dead center of this space.
The 2019 Grigri and the Grigri + both minimize the unused space in the plastic spacer, so it’s most important to familiarize yourself with the space inside for these.
There’s marginally more space to use across the screw mounting hole, though if you have thin (1.3mm or smaller) cord, either side will work.
To hit the dead center of the usable space, drill the hole for Grigri+ and Grigri (2019) in line with the bottom outline of the Petzl logo.
Next, insert the string into the hole you’ve just created, then grab the end and pull it back out of the device, a paperclip can help if your screwdriver isn’t adequate.
Next, tie a stopper knot, using a double or single overhand. Tighten this knot down as much as possible by hand, then, once you’re sure it’s set, lift the plastic spacer aside one last time and pull the knot down into place. This mod is set-it-and-forget-it, you’re not going to be opening up your grigri later to adjust things.
Now, your grigri is tethered. Re-insert the screw, tighten until flush, and you’re all set.
There are many ways to attach your grigri to the carabiner, with the three most popular using figure eight on a bight (climbers, am I right?), a bowline, or merely putting the string through the hole in the Sm’d, and tying a second stopper knot on the opposite side.
Make sure you try out your new tether before you trim the extra cord, ensuring you can clip the carabiner into the grigri and that it can rotate all the way around, when clipped in either orientation, before adding your stopper knot and trimming to an appropriate tail length.
BONUS
If you made it this far, I’ll leave you with this tidbit- this grigri can also save your life in an emergency. If you need to escape with a stuck rope, or make an extra length of rope to leave as an anchor, you can use your new grigri tether as a friction saw, pulling back and forth across a tensioned section of your rope, cutting through it fairly quickly!
Original Imgur Post (Sorry for dirty gym workshop quality!) | Gearnotes Instagram
The content relating to the grigri is fascinating, including everything from which carabiner you should use with your grigri to a wild page that suggests that Petzl has not done any testing with the grigri above 80kg (176 lbs), and that for larger loads
“we recommend increased vigilance and special attention given to verifying the compatibility of the entire system”
Technical Notice Download (from Petzl)
Grigri Inspection Procedure (from Petzl)
For many, it’s the first and second link when you google “Grigri Tether”!
They even suggest it


